IaC - Infrastructure as Code
Introduction
Infrastructure as Code (IaC) is a
paradigm in which infrastructure provisioning and management are done using
code and automation, treating infrastructure elements such as servers,
networks, and configurations as programmable entities. Instead of manually setting
up and configuring servers and resources, IaC involves writing code to define
and deploy infrastructure.
Available IaC Tools
Terraform
- Widely used IaC tool.
- Supports multiple cloud providers.
- Uses a declarative configuration language to define infrastructure as code.
- Well-suited for managing infrastructure that spans multiple cloud services and providers.
AWS CloudFormation
- Amazon's native IaC service designed specifically for AWS.
- Allows to define infrastructure using JSON or YAML templates.
- Provides built-in support for AWS resources and services, making it tightly integrated with the AWS ecosystem.
- Good choice if you want to stick to AWS-native tools and services.
Ansible
- Open-source automation tool that can be used for both configuration management and provisioning infrastructure.
- User a simple YAML-based syntax for defining playbooks that describe the desired state of your infrastructure.
- Ansible is agentless, meaning it doesn't require any software to be installed on the target systems.
- Well-suited for managing complex configurations and tasks.
Pulumi
- Newer IaC
- An open source project.
- Define infrastructure using:
- Python
- JavaScript
- Java
- Go
- TypeScript
- C#
- Offers both imperative and declarative ways to define infrastructure.
- Supports multiple cloud providers.
- Pulumi Cloud is free to use, now and forever, for individuals.
- Pulumi Team Edition offers a 14-day free trial. Once the trial is over, you get 150k free Pulumi Credits every month (equivalent to ~200 resources managed free each month).
OSS License
Terraform
uses the Business Source License 1.1. Conversely, Pulumi open-source projects
use the permissive and business-friendly Apache License 2.0. This includes the
core Pulumi repo, all of the open-source Pulumi resource providers (such as the
Azure Native provider), and other useful projects.
Third-Party
CI/CD Tools Support
Third-Party CI/CD Tools Support
Pulumi
integrates with existing CI/CD providers including AWS Code Services, Azure
DevOps, CircleCI, CodeFresh, GitHub Actions, GitLab Pipelines, Google Cloud
Build, Jenkins, Octopus Deploy, Jetbrains TeamCity, Spinnaker, and Travis.
Pulumi allows you to use the same CI/CD system for your infrastructure as your
application code. Terraform also has similar support with existing CI/CD
providers.
Chef and Puppet
- confguration management tools that can also be used for provisioning infrastructure.
- often used for configuration management
- can be extended to define infrastructure setups
Provisioning EC2 Instance using Pulumi
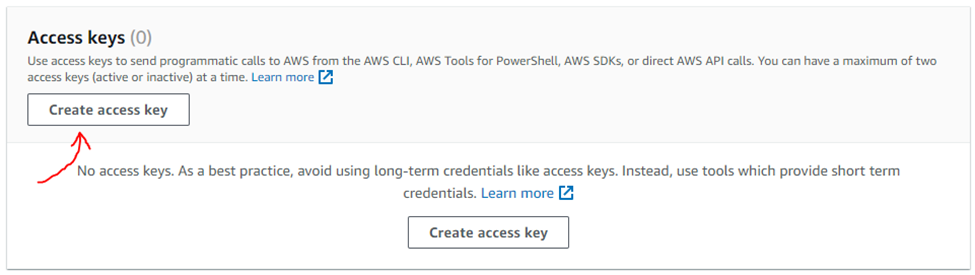
Create AWS Access Key
- Visit https://us-east-1.console.aws.amazon.com/iamv2/home#/users
- Select the user who has the admin privileges
- Click on the user


Create Account for Pulumi
You need to have license for Pulumi. You need to create an account if the account is not yet created for Pulumi. For that
- Visit to create an account page
- Enter the username, email, password
- Verify the email

Create access token for Pulumi
Need to create the access token
that will be used in the Pulumi to spin up a new EC2 instance. For that
- Login to the the Pulumi portal - https://app.pulumi.com/signin
- Click on the user icon to the top-right corner, click on Personal access tokens
- Now click on the button Create Token
- Give the description for the token
- Create on the token
- Copy and store the access key for the latter use


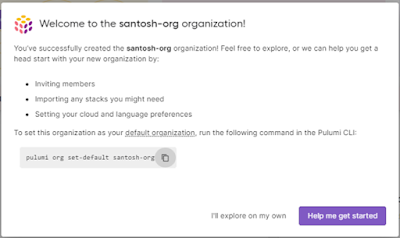
Create an Organization in Pulumi portal
Organization is needed when you provision any infrastructure
from Pulumi.
- From the left-top corner, you will see ORGANIZATION, click on + Create an organization
- Enter an organization name


Install Node.js
$ sudo apt update && sudo apt upgrade
$ wget https://nodejs.org/dist/v18.15.0/node-v18.15.0.tar.gz
$ tar -xzvf node-v18.15.0.tar.gz
$ cd node-v18.15.0/
$ make
$ sudo make install
Check if NPM is
installed successfully
$ node -v
v20.5.1
Check if NPM is installed successfully
$ npm -version
8.5.1

Install Pulumi
$ curl -fsSL https://get.pulumi.com | sh
=== Pulumi is now installed! 🍹 ===
+ Please restart your shell or add /home/ubuntu/.pulumi/bin
to your $PATH
+ Get started with Pulumi: https://www.pulumi.com/docs/quickstart
Restart the server

Check if Pulumi is installed successfully
$ pulumi version
Configure AWS credentials
$ export AWS_ACCESS_KEY_ID=<YOUR_ACCESS_KEY_ID>
$ export AWS_SECRET_ACCESS_KEY=<YOUR_SECRET_ACCESS_KEY>
$ export AWS_REGION=<YOUR_AWS_REGION>
# e.g.`ap-south-1`

Pulumi & AWS:
Create new project
$ mkdir infra-setup && cd infra-setup
$ pulumi new aws-javascript –name new-aws-ec2
- Enter your access token:
It will ask the access token, provide the access token you had created under Create access token for Pulumi - Project description: Provide a short description for the project
- stack name: it can be <your organization name>/name e.g. santosh-org/dev
- aws:region: Provide a valid region e.g. ap-south-1

Now your files are ready with
index.js

Edit index.js to create an EC2 instance with HTTP access
$ nano index.js
Add the below text:
"use strict";
const pulumi = require("@pulumi/pulumi");
const aws = require("@pulumi/aws");
const awsx = require("@pulumi/awsx");
// Create an AWS resource (S3 Bucket)
//const bucket = new aws.s3.Bucket("my-bucket");
// Export the name of the bucket
//exports.bucketName = bucket.id;
//let size = "t2.micro";
// t2.micro is available in the AWS free tier
let ami = aws.getAmiOutput({
filters: [{
name: "name",
values:
["amzn-ami-hvm-*"],
}],
owners:
["137112412989"], // This owner ID is Amazon
mostRecent: true,
});
let group = new aws.ec2.SecurityGroup("pulumi-security-group",
{
ingress: [
{ protocol:
"tcp", fromPort: 22, toPort: 22, cidrBlocks: ["0.0.0.0/0"]
},
],
});
const instance = new aws.ec2.Instance("pulumi-dev-ec2", {
instanceType:
"t2.micro",
vpcSecurityGroupIds: [
group.id ], // reference the security group resource above
ami: ami.id,
tags: {
Name:
"Pulumi-dev-ec2"
}
});
Preview and deploy your resources
$ pulumi up

